I toyed with calling this entry "Indiana Jones and the Holey Grail", but eventually decided against it on account of A) copyright infringement, B) puns are the lowest form of humor and C) Indy looks better in the hat than I do.
We recently had a swath of ceremonial chalices come in for repair. The jobs ranged from fixing a snapped stem and reassembling the entire piece to simply "make it shiny". I will walk us through the repair adventure of the chalice shown below, wherein we will learn how to build a precise supportive sleeve and also discover what kind of innuendo can be derived from making screw threads.
.JPG) |
| The finished chalice |
For me, working with ceremonial objects really brings out the dynamic between aesthetics and functionality. To an observer, this chalice is impressively gorgeous. The gold shines, the stones sparkle and the repoussage details draw the viewer in for closer inspection. To a religious person, the chalice might convey greater spiritual meaning and perhaps a sense of holiness.
The creator of the chalice and everyone who has worked on it since knows that the base is gold plated brass, the decorative cup is carefully aligned to hide scratches, and that a large threaded screw runs through the entire stem to hold each section together. On the inside, the plating is patchy or non-existent, the metal is rough and numerous poor quality lead solder repairs mar the connection points. In short, it's not so pretty. My job is to make the functional parts functional, and the pretty parts pretty.
 |
| Disassembled chalice. Left to right: Base with new threaded post, filigree bowl (upside down), stem, cup, new threaded button |
First, the piece is first taken apart and cleaned. We assess the damage, and plan our attack: The stem of the chalice is snapped near the base where the original solder joint has failed. Unfortunately, the piece has areas of gold plating that would be damaged if we used a torch to simply solder the pieces back together. Therefore I must reinforce the new joint, ensure that all components fit snugly together and secure it all with a threaded rod that will run from the base to the cup of the chalice.
Go time!
In order to stabilize the new joint, I made a supportive sleeve to fit tightly inside the broken ends of the stem. One end was cylindrical and made to slide into the base, and the other was hexagonal and fitted to the stem.
 |
| Left to right: silver sleeve, interior plate, tapped button, and threaded rod |
 |
| The cylindrical end of the sleeve fits into the base, and the hexagonal end slides into the stem. |
This connected the pieces snugly together, but I still had to ensure that they could not be pulled apart. Limited as I was to cold connection methods, I opted to make a threaded rod that would essentially screw into the whole piece, holding all components together with tension.
Cold connections are a world apart from soldering and fusing techniques and require just as much creativity. Methods include riveting, forming folded tabs, stitching metals together, and creating threaded joins. The latter is also called "tapping", and this method is what I will use.
To make a threaded connection, you simple drill a hole in one item, then use a cutting tool called a tap to slice threads into the walls of the hole, creating a receiving hole for the reciprocal screw. We use another tool to "thread" the corresponding rod, called a die. Again, cutting edges slice the plain metal rod to form a screw.
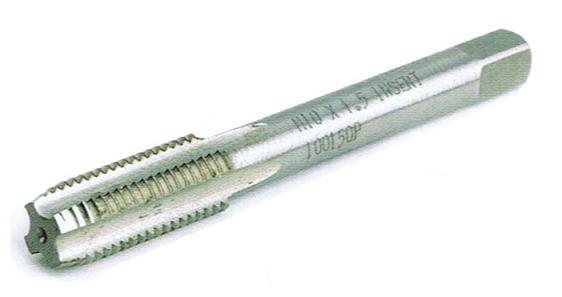 |
| A tap for creating a threaded hole |
 |
| And a reciprocal die ..... OM NOM NOM NOM |
Now it's just a matter of putting all the pieces together and tightening it up. To do this, I tap a hole in a little nubbin at the base of the 14k gold cup, and stick a threaded rod in it. Then I can slide the rest of the pieces together and make a decorative button to screw on the bottom, securing the whole system.
The button is a little disc of silver with a double-walled section of tubing soldered to the top and tapped to make internal threads. All that's left is to screw it onto the bottom of the rod like a nut, and the whole system is secure.
Tada! Chalice restored, and now it's safe for Walter Donovan to drink from it, right?
Two other completed chalices, in for similar repairs:
Tada! Chalice restored, and now it's safe for Walter Donovan to drink from it, right?
 |
| An exploded picture of the chalice. From left to right, top row: Base plate, base, handmade silver sleeve, stem, filigree cup, 14k gold chalice bowl. Bottom row: handmade button, locking nut, threaded rod. This assemblage would run through the parts displayed above, locking it all together. |
 |
| Bottom of fully assembled chalice, button in place |
 |
 |
No comments:
Post a Comment